TurtleRescueNES
Active member
As requested in the Facebook group, here is a quick tutorial on how to spawn (near) unlimited monsters, and why that is not a good idea. ")
In my example, which will appear in my "Turtle Rescue" game, I will use a beehive that spawns bees. You may use this for other purposes. For my tutorial, I will use "beehive" to identify the monster that spawns, and "bees" to identify the spawned monster.
Before we begin, create your beehive and bee monsters. They should be in the same monster tileset. Bees will be set up to behave as any normal monster. They are fully capable to function on their own. Your beehive is a placeholder for right now. We'll apply additional functionality to it later. Remember bounding boxes, health settings and to make them monster types!
Assign the beehive to a monster group. It is actually not required to assign the bees to the same monster group as the beehive, but for testing purposes, you should add them as well.
Create a test screen, assign your new monster group to the screen's Day Monsters. Place a bee and a beehive on the screen. For testing purposes, you should place your player on the same screen as well.
Export and test your game. Nothing special should be happening at this point, You just want to confirm your bee is behaving as expected, and your beehive just appears. It's not supposed to do anything yet.
Now we need to get down and dirty with code... well, not really. There's not all that much, really.
First, create two user defined constants in Project Settings:
MON_SPAWN_MAX -- Value: 5 -- The number of monsters that will appear on the screen when the beehive stops generating bees. You can change this later.
MON_SPAWN_ID -- Value: ## -- The unique ID number of your bee monster. To determine this, go to your Monster Graphic Banks, Monsters list, and starting with 16, count the number of monsters down your list that your bee appears. For example, if your bee is the 5th monster, the ID value will be 20.
Now for the code itself!
Create a new SpawnMonsters.asm file in your AiScripts folder
Insert the following code:
Save your ASM file.
Open Project Settings / Script Settings and assign your SpawnMonsters.asm to an open AI Action script.
You can also rename this AI script on the Project Labels tab, then Action Types
Now that the script is done, it is a good idea to export and test your game again. Nothing will have changed, but given that we've added new code, it is an excellent time to make sure it hasn't broken our game.
Now let's start to make that beehive a monster spawning machine!!!
Reopen your beehive monster. Is should have two action states.
Action State 0 will have a timer. In my case, I used 6. You may use whatever you want and can change it later. This controls the pace the bees will appear. No action is placed on this state. Select "Advance" for the EndAction setting.
On Action State 1, select the new action to reflect the new SpawnMonsters AI behavior. Change the EndAction to GoToFirst.
This is what will tell the beehive to create a bee, then loop over again. The bee will not appear if the screen already has MON_SPAWN_MAX number of monsters onscreen. Kill off a bee, and another will spawn. The only way for the player to stop the bees is to destroy the beehive.
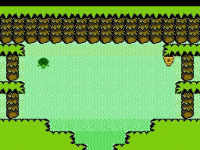
Build your game, and all should work as you expect. In my GIF below, I show that you could generate far more than five bees, but it would be unwise. The NES will eventually slow down, and also the player is going to get overwhelmed. So place a reasonable max to make everyone happy.
Good luck!
UPDATE: Thanks to vanderblade for helping test this. I created this on a different module than what many are using, so your experience may vary.
In my example, which will appear in my "Turtle Rescue" game, I will use a beehive that spawns bees. You may use this for other purposes. For my tutorial, I will use "beehive" to identify the monster that spawns, and "bees" to identify the spawned monster.
Before we begin, create your beehive and bee monsters. They should be in the same monster tileset. Bees will be set up to behave as any normal monster. They are fully capable to function on their own. Your beehive is a placeholder for right now. We'll apply additional functionality to it later. Remember bounding boxes, health settings and to make them monster types!
Assign the beehive to a monster group. It is actually not required to assign the bees to the same monster group as the beehive, but for testing purposes, you should add them as well.
Create a test screen, assign your new monster group to the screen's Day Monsters. Place a bee and a beehive on the screen. For testing purposes, you should place your player on the same screen as well.
Export and test your game. Nothing special should be happening at this point, You just want to confirm your bee is behaving as expected, and your beehive just appears. It's not supposed to do anything yet.
Now we need to get down and dirty with code... well, not really. There's not all that much, really.
First, create two user defined constants in Project Settings:
MON_SPAWN_MAX -- Value: 5 -- The number of monsters that will appear on the screen when the beehive stops generating bees. You can change this later.
MON_SPAWN_ID -- Value: ## -- The unique ID number of your bee monster. To determine this, go to your Monster Graphic Banks, Monsters list, and starting with 16, count the number of monsters down your list that your bee appears. For example, if your bee is the 5th monster, the ID value will be 20.
Now for the code itself!
Create a new SpawnMonsters.asm file in your AiScripts folder
Insert the following code:
Code:
;; JTS Spawn Monsters
;; In this case, spawn bees from beehive monster


    LDA monsterCounter
    CMP #MON_SPAWN_MAX
    BCS labDoNotSpawn


    labSpawnBees:


    TXA
    STA tempx

    ;; get offset
    LDA Object_x_hi,x
    CLC
    ADC #$04 ;; arbitrary...would put an 8x8 proj in the center of a 16x16 object
    STA temp1
    CLC
    ADC #$04 ;; arbitrary...would put a 8x8 proj in the center of a 16x16 object
    LDA Object_y_hi,x
    STA temp2
 ;;   Use one of the two commands below based on your version
 ;;   CreateObject temp1, temp2, #MON_SPAWN_ID, #$00   ;Use this line for 4.0.X
 CreateObject temp1, temp2, #MON_SPAWN_ID, #$00, currentNametable    ;Use this line for 4.1.X


    labDoNotSpawn:
    LDX tempx
Save your ASM file.
Open Project Settings / Script Settings and assign your SpawnMonsters.asm to an open AI Action script.
You can also rename this AI script on the Project Labels tab, then Action Types
Now that the script is done, it is a good idea to export and test your game again. Nothing will have changed, but given that we've added new code, it is an excellent time to make sure it hasn't broken our game.
Now let's start to make that beehive a monster spawning machine!!!
Reopen your beehive monster. Is should have two action states.
Action State 0 will have a timer. In my case, I used 6. You may use whatever you want and can change it later. This controls the pace the bees will appear. No action is placed on this state. Select "Advance" for the EndAction setting.
On Action State 1, select the new action to reflect the new SpawnMonsters AI behavior. Change the EndAction to GoToFirst.
This is what will tell the beehive to create a bee, then loop over again. The bee will not appear if the screen already has MON_SPAWN_MAX number of monsters onscreen. Kill off a bee, and another will spawn. The only way for the player to stop the bees is to destroy the beehive.
Build your game, and all should work as you expect. In my GIF below, I show that you could generate far more than five bees, but it would be unwise. The NES will eventually slow down, and also the player is going to get overwhelmed. So place a reasonable max to make everyone happy.
Good luck!
UPDATE: Thanks to vanderblade for helping test this. I created this on a different module than what many are using, so your experience may vary.